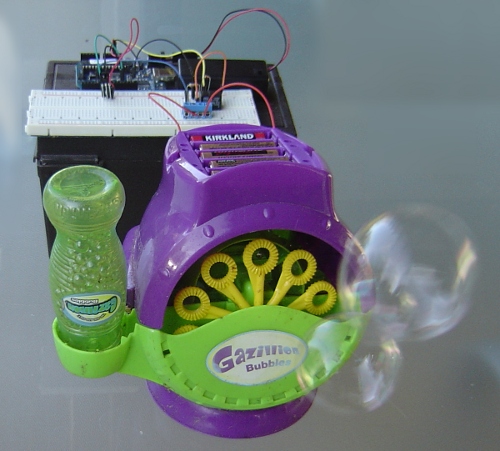
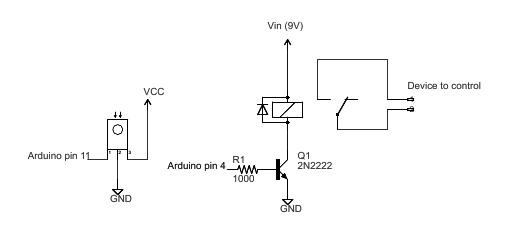
The circuit is straightforward. An IR sensor is connected to the Arduino to detect the infrared signal. On the output side, I used a standard relay circuit. To control the bubble maker, I wired the relay in place of the power switch. A 5 volt source wasn't enough to close the relay I had handy, but 9 volts was. For this reason, I powered the Arduino off a 9V battery and connected the relay to Vin so the relay would get the full 9 volts. (A 9 volt AC adapter also works.)
The code
The following code controls the relay. Any detected IR code will toggle the output on or off. Press a button once on the remote and the output will turn on. Press a button again and the output will turn off. (You will, of course, need to download my Arduino infrared remote library to use this code.)
#include <IRremote.h>

int RECV_PIN = 11;
int OUTPUT_PIN = 4;

IRrecv irrecv(RECV_PIN);
decode_results results;

void setup()
{
  pinMode(OUTPUT_PIN, OUTPUT);
  pinMode(13, OUTPUT);
  irrecv.enableIRIn(); // Start the receiver
}

int on = 0;
unsigned long last = millis();

void loop() {
  if (irrecv.decode(&results)) {
    // If it's been at least 1/4 second since the last
    // IR received, toggle the relay
    if (millis() - last > 250) {
      on = !on;
      digitalWrite(OUTPUT_PIN, on ? HIGH : LOW);
    }
    last = millis();
    irrecv.resume(); // Receive the next value
  }
}
The above code only toggles the output if there is at least a 1/4 second (250 ms) gap since the last received signal. The motivation behind this is that remotes often repeat the signal as long as the button is held down, and we don't want the output to toggle continuously. One other thing to notice is the call to resume(); after a code is received, the library stops detection until resume() is called.
I should make it clear that although the above example uses a relay output, the relay is just for example. The above code will work with any arbitrary output: you can use it to control a LED or anything else that can be controlled by an Arduino output pin.
Using two buttons
Another way you might want to use an IR remote is have one button turn the output on, and another button turn it off. Here's the loop code to use a Sony DVD remote; the "play" button turns the output on, and the "stop" button turns the output off:
void loop() {
  if (irrecv.decode(&results)) {
    if (results.value == 0x4cb92) { // Sony DVD play
      digitalWrite(OUTPUT_PIN, HIGH);
    }
    else if (results.value == 0x1cb92) { // Sony DVD stop
      digitalWrite(OUTPUT_PIN, LOW);
    }
    irrecv.resume(); // Receive the next value
  }
}
Just remember that you have to call resume after all decodes, not just the ones you're interested in.
Getting the codes
You may wonder how I got the Sony codes. One way is to look at the appropriate LIRC config file. (At some point I'll write up a full explanation of the LIRC config files.) An easier way is to just dump out to the serial port the codes that your Arduino receives. Press the buttons on your remote, and read out the values received:
void loop() {
  if (irrecv.decode(&results)) {
    Serial.println(results.value, HEX);
    irrecv.resume(); // Receive the next value
  }
}
Using a specific button
A third way you might want to use an IR remote is to have a specific button toggle the output on and off. Here's code that uses the Tivo button on a Tivo Series 2 remote to toggle the output on and off. Again, you can get the button code from a LIRC config file, or by dumping the output to your serial port.
void loop() {
  if (irrecv.decode(&results)) {
    if (results.value == 0xa10ce00f) { // TIVO button
      // If it's been at least 1/4 second since the last
      // IR received, toggle the relay
      if (millis() - last > 250) {
        on = !on;
        digitalWrite(OUTPUT_PIN, on ? HIGH : LOW);
      }
      last = millis();
    }
    irrecv.resume(); // Receive the next value
  }
}
The hardware setup
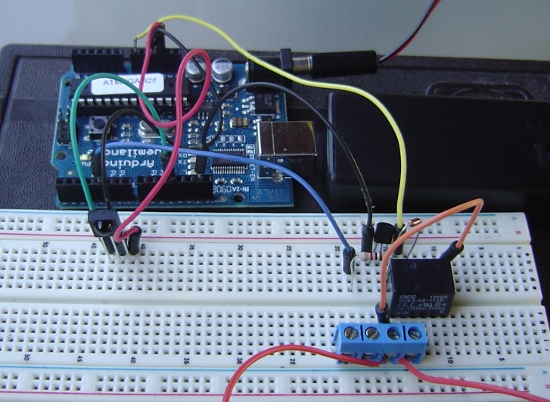
The hardware setup is pretty simple. The above photo shows the IR detector on the left, and the relay on the right. The drive transistor, resistor, and diode are behind the relay, and the blue terminal strip is in front. The black box to the right of the Arduino is a 9V battery holder. The box underneath is just to hold everything up.
You may wonder why I placed the input and output components so far apart, and why I didn't use the protoboard power and ground buses. It turns out that the motor on the bubble maker is a nasty source of RFI interference that would jam the IR detector's signal if the wires to the bubble maker came near the IR detector wiring. Capacitors didn't help, but distance did. Most likely this won't be a problem for you, but I figured I should mention it.
In conclusion, happy hacking with the infrared library. Let me know if you do anything interesting with it!
8 comments:
Ken great post. I'm planning on doing a project myself base on the arduino IR Library, but I have a question, how can I convert the Raw data files to Hex, For generic codes..
Ken great post. I'm planning on doing a project myself base on the arduino IR Library, but I have a question, how can I convert the Raw data files to Hex, For generic codes..
// Demo code for Mr.tidy MkII
#include // IRremote Library originally written by Ken Shirriff (2009) - http://arcfn.com
#include // IRremote5 modified by RobotFreak to use timer5 instead of timer2 (2011)
It is possible where to download IRremoteInt5.h and IRremote5.h?
I was wondering about the ? in the code where you used digitalWrite(OUTPUT_PIN, on ? HIGH : LOW); as i could not find a reference to this. its funny cause i stayed up all night trying to make a code to do just what you had already written here and just stumbled upon it by chance. BTW i just got my arduino 2 days ago so im so excited about this its no even phunny. i have alot to learn i want to use my arduino to control a motor using various pressure sensors and having some stand alone adjustment on it that would be selectable and viewable through a lcd screen. so i have alot to learn and am really glad i found your sight
plsss help me plsssssssssssssssssssssssss
http://forum.arduino.cc/index.php?topic=323529.0
Hi, in "Using a specific button" can you give a sample code to control 'two outputs'.
nice tutorial, would it be possible to upload this sketch to work on Attiny85 rather than use a Arduino. keep up the great work
Its very helpful.Thanks
Post a Comment