Showing posts with label sheevaplug. Show all posts

IPv6 web serving with Arc or Python: adventures in IPv6

Lego Minifig on a Sheevaplug running IPv6 I've been experimenting with IPv6 on my home network. In part 1, I described how I set up an IPv6 tunnel on Windows 7 and how IPv6 killed my computer. Now, I will describe how I set up a simple (i.e. trivial) IPv6 web server using Arc or Python, on Windows or Linux, which can be accessed at http://ipv6.nlanguages.com.

My IPv6 explorations are roughly driven by Hurricane Electric's IPv6 Certification levels. To get from "Newbie" to "Enthusiast" you have to have an IPv6 web server. I expected I could just use the web server you're viewing right now (provided through Pair), but Pair (like most web providers) doesn't support IPv6. So I figured I'd just set up my own simple web server.

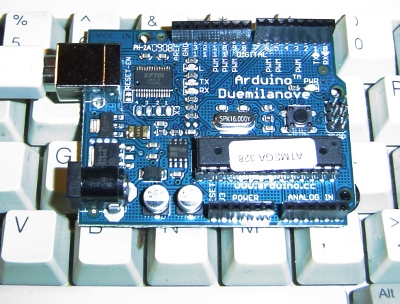
To make things more interesting, I decided to set up the server on my Sheevaplug, a very small plug-based computer running Linux. (See my previous articles about Arc on the Sheevaplug, and Arduino with the Sheevaplug.) The things I describe will work just as well on a standard Linux or Windows box, though.

Setting up the SixXS IPv6 tunnel on the Sheevaplug was much easier than setting it up on Windows; I just followed the directions. One gotcha: if your clock is wrong, aiccu will silently fail - check /var/log/syslog.

IPv6 with the Python web server

Python comes with a simple web server. It is easy to configure the web server for IPv6 once you know how, but it took some effort to figure out how to do it.
import socket
from BaseHTTPServer import HTTPServer
from SimpleHTTPServer import SimpleHTTPRequestHandler

class MyHandler(SimpleHTTPRequestHandler):
  def do_GET(self):
    if self.path == '/ip':
      self.send_response(200)
      self.send_header('Content-type', 'text/html')
      self.end_headers()
      self.wfile.write('Your IP address is %s' % self.client_address[0])
      return
    else:
      return SimpleHTTPRequestHandler.do_GET(self)

class HTTPServerV6(HTTPServer):
  address_family = socket.AF_INET6

def main():
  server = HTTPServerV6(('::', 80), MyHandler)
  server.serve_forever()

if __name__ == '__main__':
  main()
Most of this code is standard Python SimpleHTTPServer code. It implements a handler for the path /ip, which returns the client's IP address. For other paths, SimpleHTTPRequestHandler returns a file from the current directory; this is not particulary secure, but works for a demonstration.

The key change to support IPv6 is subclassing HTTPServer and setting the address_family to IPv6. The other key change is starting the server with the name '::', which is the IPv6 equivalent of '', and binds to no specific address. Similar changes work with related Python classes such as SocketServer.

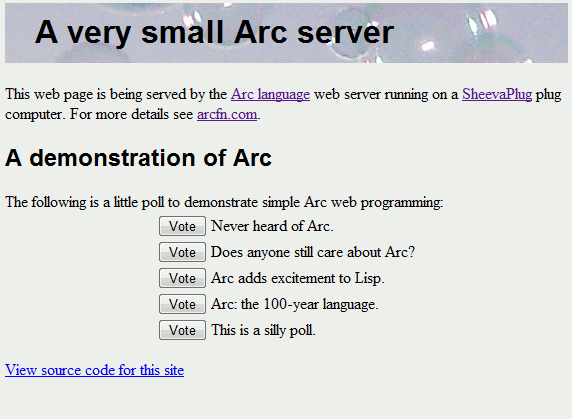
IPv6 with Arc's web server

My next adventure was to run Arc's web server (which I've documented here) on IPv6. Much to my surprise, Arc's web server worked on Windows with IPv6 without any trouble. You don't have to do anything different to serve on IPv6 and the code and logs handle IPv6 addresses as you'd expect. (Most of the credit for this should go to MzScheme/Racket, which provides the underlying socket implementation.)

I simply start a server thread on port 80, and then define a simple web operation on the home page (represented as || for obscure reasons).

arc> (thread (serve 80))
arc> (defop || req (pr "Welcome to Arc!  Your IP is " (req 'ip)))
Accessing this home page displays a message and the IP address of the client (IPv4 or IPv6 as appropriate).

Unfortunately, when I tried running the same Arc code on the Sheevaplug or another Linux box, it refused to work at all with IPv6. The problem turned out to be misconfiguration in the compilation of Racket (the new name for mzscheme). To get IPv6 working, you can recompile Racket following the instructions here. After recompiling, I was able to get Arc working on my Sheevaplug with IPv6. Eventually this fix will get into the official builds.

Note that implementing web pages in Arc requires much less boilerplate than in Python. This isn't too surprising, given that the primary application of Arc is web serving.

Putting the server's IPv6 address into DNS

Once you have an IPv6 web server, how do you access it? You can access a server with a raw IPv6 address: http://[2001:1938:81:1f8::2]/mypage. (Note that the IPv6 address is enclosed in square brackets, unlike a regular IP address.) However, you'll almost certainly want to access your IPv6 server through a domain name in DNS. To do this, you need to create an AAAA record in your domain zone file.

I had the domain name nlanguages.com available, and wanted to point it at my IPv6 web server. To do this, I went to the DNS Zone File Editor for my nameserver (godaddy.com in my case). I created one AAAA entry for host @ to point to my IPv6 address, and a second AAAA entry for host ipv6 to point to my IPv6 address. The @ provides an entry for my top-level domain (nlanguages.com), and the second provides an entry for ipv6.nlanguages.com. I then tested the DNS entries with a nslookup query, asking for the AAAA record: nslookup -q=aaaa nlanguages.com

The result is that http://ipv6.nlanguages.com will access my IPv6 server (if you have IPv6 access.)

Conclusion

Running a simple IPv6 web server in Python or Arc is straightforward, at least if you don't run into a problem with the underlying language implementation. Python requires just a couple additional lines to support IPv6, while Arc supports IPv6 automatically. Thus, you can easily set up an IPv6 web server, just in time for World IPv6 Day.

IPv6 killed my computer: Adventures in IPv6

Lego Minifig examining IPv6 configuration 
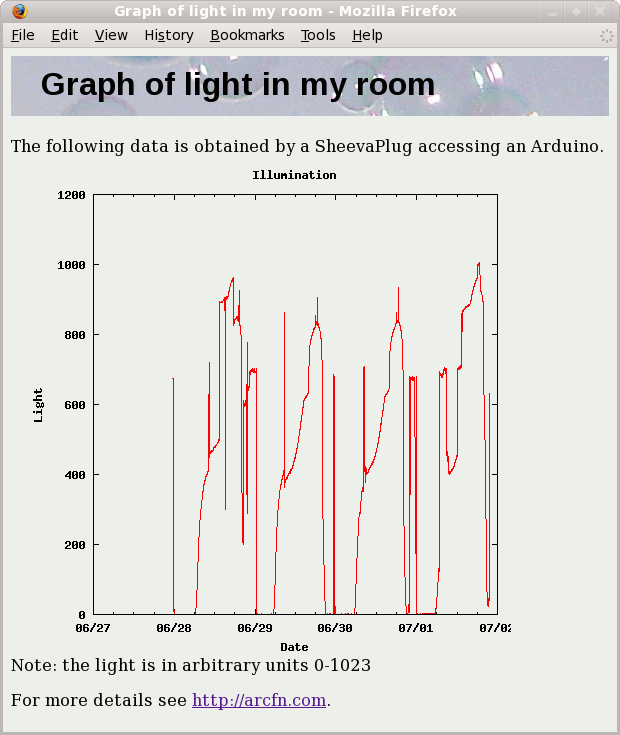
You may have heard that the Internet is running out of IP addresses and disaster will strike unless everyone switches over to IPv6. This may be overhyped, since civilization continues even though the last block of addresses was given out on February 3, 2011.

However, with World IPv6 Day fast approaching (June 8), I figured this was a good time to try out IPv6 on my home network. I was also motivated by Hurricane Electric's IPv6 Certification (which is a "fun and educational" certification, not a "study thick books of trivia" certification).

This article describes my efforts to run IPv6 on my Windows 7 64-bit machine, and future articles will describe other IPv6 adventures.

IPv6 tunnels

If your ISP provides IPv6, then using IPv6 is easy. Comcast, for instance, is rolling out some IPv6 support. Unfortunately, AT&T (which I have) doesn't provide IPv6 and is lagging other providers in their future IPv6 plans.

The alternative is an IPv6 tunnel, which lets your computer connect to IPv6 sites over a normal IP connection. The number of different IPv6 tunnel mechanisms is very confusing: 6to4, Teredo, AYIYA, and 6in4, to name a few.

A Hacker News thread recommended Hurricane Electric's free tunnel, so I tried that. Unfortunately that tunnel requires IP protocol 41, and I quickly found that my 2Wire AT&T router inconveniently blocks protocol 41.

SixXS IPv6 tunnel on Windows 7 64-bit

Next, I tried SixXS's free IPv6 tunnel service, which doesn't require protocol 41 and promises IPv6 in 10 easy steps. This went well until Step 5, and then things got complicated.

This section gets into the gory details of setting up the tunnel; it's only to help people who are actually setting up a tunnel, and can be ignored by most readers :-)

Eventually I figured that for Windows 7 64-bit, you should ignore most of the 10 easy steps. Instead, get the Tap driver by installing OpenVPN according to the Vista64 instructions. Then go to the Vista instructions and follow all the mysterious steps including the obscure Vista parameter setup commands. Finally, use the AICCU command line, not the GUI.

If you encounter these errors, you're probably using the wrong Tap driver:

tapinstall.exe failed.
[warning] Error opening registry key: SYSTEM\CurrentControlSet\Control\Class\{4D
36E972-E325-11CE-BFC1-08002BE10318}\Properties (t1)
[warning] Found = 0, Count = 0
[error] [tun-start] TAP-Win32 Adapter not configured properly...
Finally, I was able to get my tunnel running with aiccu-2008-03-15-windows-console.exe start.

Once I had the tunnel running, my computer had an IPv6 address, it could talk to other IPv6 addresses, and my computer could be accessed via IPv6.

So now that I have IPv6 running on my computer, what can I do with it? Well, that's one of the problems. There isn't a whole lot you can do with IPv6 that you couldn't do before. You can connect to ipv6.google.com. You can see the animated kame turtle instead of the static turtle. You can see your IPv6 address at whatismyipv6address.com. But there's no IPv6 killer app.

Overall, the immediate benefit of running IPv6 is pretty minimal, which I think is a big barrier to adoption. As I discussed in a surprisingly popular blog post, the chance of adoption of a new technology depends on the ratio of perceived crisis to perceived pain of adoption. Given a high level of pain to run IPv6 and a very low benefit - any potential crisis is really someone else's crisis - I expect the rate of adoption to be very slow until people are forced to switch.

Getting IPv6 running reminds me a lot of TCP/IP circa 1992, when using TCP/IP required a lot of configuration, tunneling (over a serial line) with SLIP, and using immature software stacks such as Winsock. And most of what you wanted to do back then didn't even need TCP/IP. It will be interesting to see how long it takes IPv6 to get to the point where it just works and nobody needs to think about it. (None of this is meant as a criticism of SixXS or Hurricane Electric, by the way, who are providing useful free services. AT&T on the other hand...)

Running IPv6 did let me gain another level in the Hurricane Electric certification, though.

IPv6 kills my computer

The day after setting up IPv6, I turned on my computer. The power light came on, and that was all, no Windows, no BIOS screen, and not even a startup beep. I tried a different monitor with no luck. I opened up the computer, re-seated the memory modules, and poked at anything else that might be loose. I powered up my system again, and everything worked, fortunately enough.

The pedant might insist that IPv6 didn't kill my computer since any IPv6 issues wouldn't show up until after the OS boots, and IPv6 couldn't possibly have stopped my computer from even booting to the BIOS. However, I remain suspicious. Just a coincidence that I set up IPv6 and my computer dies? I don't think so. What about the rest of you? Anyone's computer get killed by IPv6?

Sheevaplug as IPv6 router

A few weeks later, I decided to try using my Sheevaplug as an IPv6 router for my home network, so all my machines could access IPv6 through my Sixxs tunnel. Although I used a Sheevaplug, these steps should work for other Linux systems too. The following are the gory details in the hope that they may be helpful to someone.

I started with the page Sixxs Sheevaplug, which describes how to set up the Sheevaplug with IPv6. Unfortunately, it didn't quite work. It suggests using a program called ufw, which stands for Uncomplicated FireWall. Unfortunately, I found it to be anything but uncomplicated. The first problem was that the default ufw version 0.29 didn't work for me - it failed to create the necessary chains with the inconvenient side-effect of blocking all ports; version 0.30 avoids this problem. I ended up using ip6tables directly, which was much easier - see instructions here.

The steps I took to setting up the Sheevaplug:

  • Request a subnet from Sixxs. In the examples below, I use: 2001:1938:2a9::/48. Important: use your subnet, not mine.
  • aiccu start to start the tunnel
  • sysctl -w net.ipv6.conf.all.forwarding=1 to enable IPv6 routing.
  • Configure /etc/radvd.conf as follows:
    interface eth0
    {
     AdvSendAdvert on;
     AdvLinkMTU 1280;
     prefix 2001:1938:2a9::/64
     {
                   AdvOnLink on;
                   AdvAutonomous on;
     };
    };
    
    Note that your subnet is /48, but you need to use /64 in the file.
  • ip -6 ro add 2001:1938:2a9::/48 dev lo
  • ip -6 add add 2001:1938:2a9::1/64 dev eth0
    I'm not sure why adding that address is necessary, but routing just doesn't work without it.
  • service radvd start
    radvd is the Router Advertisement Daemon, which lets other computers on your network know about your IPv6 tunnel.
At this point, you should be able to start up a Windows box, and it will automatically get an IPv6 address on the subnet. You should then be able to access ipv6.google.com or ip6.me.

Debugging: if the IPv6 subnet doesn't work, many things can be wrong. First, make sure your host machine can access IPv6. Assuming your client machine runs Windows, you can do "ping -6 ipv6.google.com" or "tracert -6 ipv6.google.com". With "ipconfig /all" you should see a "Temporary IPv6 Address" on the subnet, and a "Default Gateway" pointing at your Sheevaplug. If tracert gets one step and then hangs, try disabling your firewall on the Sheevaplug. If these tips don't work, then I guess you'll end up spending hours with tcpdump like I did :-(

Also read Part 2: IPv6 Web Serving with Arc or Python.

Arc + Arduino + ARM: Temperature monitoring

I'm using my Arc web server running on an ARM-based SheevaPlug to get analog data from my Arduino. The frame below and the graph of temperature and illumination are coming live are a screenshot from the SheevaPlug; they are dynamically generated by some simple Arc code which also collects the data from the Arduino. (Note: this is currently a screenshot, as I'm currently using the SheevaPlug for another project.)
screenshot
The graph shows the daily cycle of illumination (green line), as well as temperature climbing during the day (red line). The temperature goes way, way up when the sun hits the temperature sensor directly. Perhaps I should find some shade for it. For one day, the data went crazy; this is where the wires from the sensor got knocked out of the Arduino by the vacuum cleaner.

The SheevaPlug and Arduino

The Arc web server is running on the ARM-based SheevaPlug, a small Linux server that plugs into the wall. It is connected by USB to an Arduino microcontoller, which does the analog to digital conversion. In the photo, the SheevaPlug also has an Ethernet cable attached. A 4-conductor wire connects the Arduino to the temperature and light sensors outside. This wire is old phone cable, but as described below, I probably should have used something more shielded.

The Arduino code

The Arduino sketch (download) simply reads the voltages and writes them to the serial port:
#define SUPPLY 5.14 // Supply voltage (measured)

void setup() {
  Serial.begin(9600);
}

void loop() {
  float v = analogRead(TEMP_PIN) * SUPPLY / 1024;
  float c = (v - .5) * 100;
  Serial.print(c); 
  Serial.print(" ");
  Serial.println(analogRead(SUN_PIN), DEC);
  delay(5000);
}
Note that I've hardwired the supply voltage, as it's needed for the conversion. The Celsius temperature is obtained directly from the measured voltage (10mV per degree, and offset by .5V to allow negative temperatures).

The Arc code

The Arc server code (download) is straightforward. It leverages my earlier Arc example server code (download).

A background thread fetches the time / sun data lines from the serial port and writes the data to a file. It converts Celsius to Fahrenheit and limits the updates to one per minute:

(def logdata ()
  (w/appendfile outf "/tmp/data"
    (w/stdout outf
      (w/infile serial "/dev/ttyUSB0"
        (let oldtimestamp nil
          (while 1
            (with ((degc sun) (tokens (readline serial))
                  timestamp (gettimestamp))
              (when (isnt timestamp oldtimestamp)
                (let degf (+ 32 (* 9. (/ (coerce degc 'num) 5.)))
               (prn timestamp " " (num degf 2) " " sun)
                  (= oldtimestamp timestamp))))))))))

(new-bgthread 'logdata (fn () (logdata)) 0)
The simple web page is generated in Arc, but the graph itself is generated by gnuplot. Since this is currently a static page, it's a bit of overkill to use the Arc functions to generate the page.
(defop temperature req
  (system "gnuplot < gnuplotcmd")
  (page
    (tag h1 (prn "Temperature and light: Arc + Arduino + ARM"))
    (gentag img src "/graph.png")
    (tag br)
    (prn "This web page is being served by the") (link "Arc language" "http://www.righto.com/doc/index.html") (pr " web server running on a ")
    (link "SheevaPlug" "http://www.righto.com/2009/06/arduino-sheevaplug-cool-hardware.html")
    (pr " plug computer.") (pr "  For more details see ")
    (link "arcfn.com" "http://www.righto.com")
    (pr ".")
    (para)
    (link "View source code for this page" "/source-t")))

Arc vs. Python

I implemented a similar Arduino graph server in Python a few weeks ago. Overall, both Python and Arc make it easy to set up a simple web server. Comparing the Python code with the Arc code reveals Arc's lack of libraries.

The first problem with Arc is it doesn't have a serial library, so I can't configure the baud rate and parameters on my serial port from Arc. I'm just assuming it's set up right, and that's working but not very robust.

The second problem I encountered was creating the timestamps on the data. The latest version of Arc has a timedate function to generate a timestamp but unfortunately that's only in GMT. I tried writing a routine to convert the time to the local timezone, but that got rather annoying. In addition, Arc doesn't have any printf-like formatting, so I had to make my own formatting routine to generate zero-padded strings of the form "12:05". I rapidly decided that writing timezone functions wasn't what I wanted to do, and ended up just using the Unix date command. (This confirm's "kens' law": Any sufficiently complicated Arc application requries the use of 'system to get things done.)

; return a timestamp of the form 2009-08-20 19:22
(= tz "America/Los_Angeles")
(def gettimestamp ()
  (trim (tostring (system (string "TZ=" tz " date +'%m-%d-%Y %H:%M'")))))
I'd have to say that Python is clearly the easier solution overall.

Hardware details

sensors 
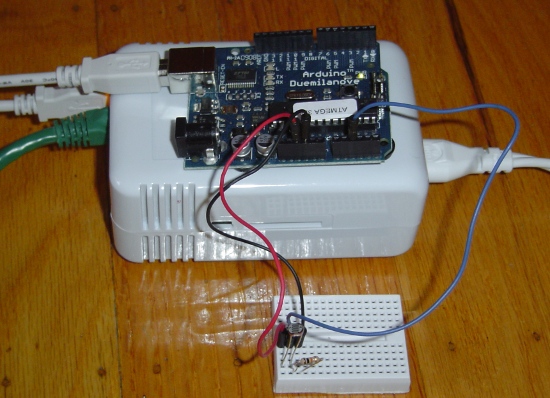
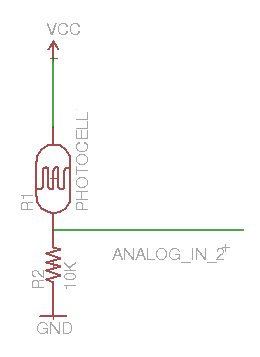
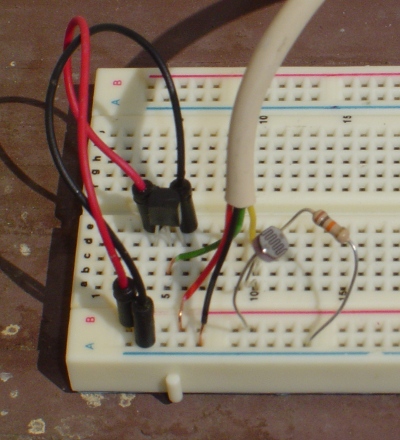
The circuit is pretty trivial. It measures light with a photocell and temperature with a TMP36 temperature sensor (tutorial). (The TMP36 is the three-wire black part that looks like a transistor.) These parts generate voltages that are read by the Arduino's analog-to-digital converters. The temperature sensor's voltage directly gives the Celsius temperature, while the photocell's light measurement is not calibrated to anything.

I had several problems with temperature measurement. First, the Arduino's A/D converter converts relative to its power supply voltage, so the temperature is only as stable as the power supply, and must be manually calibrated. Second, the 10 feet of unshielded phone wire between the Arduino and the temperature sensor introduced a lot of noise. Notice the 10 degree fluctuations on the first day of measurement. I added bypass capacitors after the first day, and the measurements are much smoother. Finally, the temperature sensor heats up a lot when the direct sun hits it in the late afternoon, apparently reaching 140° F. I guess there's a reason why real meteorologists put their temperature sensors in sheltered boxes instead of directly in the sun.

If I were doing this again, I'd probably use a digital temperature sensor such as the One-wire DS18B20; this would avoid the analog calibration and noise issues.

It would be cool to replace the wire between the Arduino and the sensors with Xbee wireless networking. Since I don't have any Xbees, the wire will have to suffice for now.

The photocell voltage is generated from a simple resistor divider. After the second day I changed the resistor from 10K to 1K so the curve wouldn't saturate in the bright sun. (10K worked fine indoors, but outdoors is much brighter.) You can see the break in the green line where I changed resistors.
Schematic

Conclusion

Arc and the SheevaPlug have been more reliable than I expected; my code has been running for a couple of weeks without problems. I think the SheevaPlug makes a good platform for this sort of project. Using Arc, however, is more of an "experimental curiosity"; I'd recommend a different language unless you really want to use Arc.

I have a few other related postings:

World's smallest Arc server

The frame below is being served was being served by the Arc language web server running on a SheevaPlug plug computer. (I've replaced the live connection with a screenshot, as I needed to use the SheevaPlug for something else.) Screenshot

The SheevaPlug

SheevaPlug in the wall 
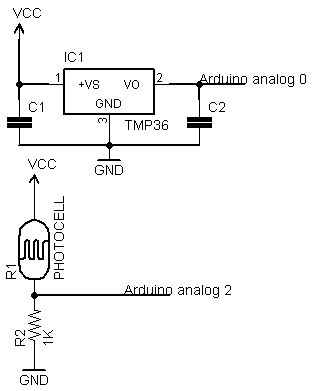
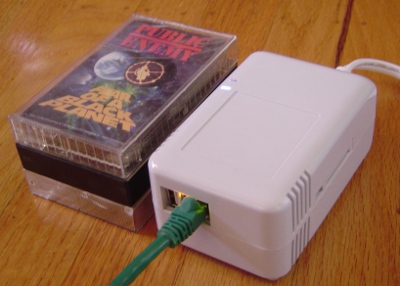
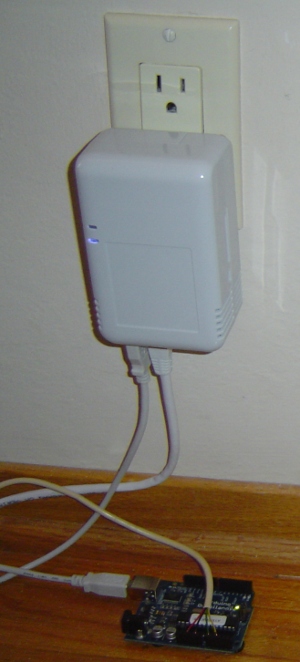
The SheevaPlug is a compact, inexpensive ($99), low-power (5W), ARM-based Linux server built into a wall-plug. It's fairly powerful despite its size, with an Ethernet port, Flash storage, and a 1.2GHz processor. See plugcomputer.org for more information.

Marvell gave me a SheevaPlug and I thought it would be an interesting platform for experimenting with Arc as a web server. The SheevaPlug seems like a good platform for an always-running web server.

The picture shows the SheevaPlug plugged into the wall, with the Ethernet cable at the bottom. That's not a wall-wart power supply; that's the whole computer.

Since the plug runs Linux, I can just ssh into it and use it like any other Linux server. I installed mzscheme on the SheevaPlug (apt-get install mzscheme), downloaded the Arc language with wget, used iptables to map port 80 to port 8080, and so on. Dynamic DNS provides a DNS name for my SheevaPlug.

Arc

Arc is a new dialect of Lisp, designed by Paul Graham and Robert Morris. It's designed to be compact, flexible, and useful for exploratory programming.

The Arc language now (finally) runs on the current version of mzscheme (link). The ARM version of mzscheme 4.1.3 is easily installable on the SheevaPlug, making it straightforward to run Arc on the SheevaPlug.

The demo is a simple program using the Arc web server. It lets you vote on a set of choices and then graphs the result using a simple HTML/CSS graph. The Arc demo also serves its own source code here.

I'm using Arc on the SheevaPlug mostly to see if it works, since I've been using Arc for a while. For normal SheevaPlug use, you'd probably want to use Apache, PHP, Python, or another normal web server configuration; they all have ARM packages that you can simply install.

I'm just assuming this is the world's smallest Arc server; we'll see if anyone runs Arc on something smaller.

If the server is not working, either I shut it down to do something else or it crashed. Send me email and let me know. You can access the server without the iframe here.

I've also used a Python web server on the SheevaPlug, which is a more mainstream way to go than Arc. In that case, I connected an Arduino to the SheevaPlug, so my Arduino could be accessed over the web.

Admittedly, the demo is just a proof-of concept. The next step is to do something non-trivial with the SheevaPlug and Arc.

Arduino + SheevaPlug = Cool Hardware Platform

I recently started using an Arduino in combination with a SheevaPlug as a convenient platform for hardware hacking. The two work together well, with complementary strengths. This describes my experience.

The Arduino

The Arduino is a popular microcontroller platform consisting of a small, inexpensive board and an easy-to-use C-based development environment. The board has multiple digital I/O pins and analog inputs, and a USB serial port connection for programming and communication. The Arduino can be interfaced with a wide variety of hardware. (The Arduino is kind of like a Microchip PIC development board, but uses the ATmega328 AVR microcontroller.) The Arduino is about the size of a credit card (but thick). It has connectors on top which will receive a daughter board (inexplicably called a "shield"), or jumper wires.
The Arduino board
The Arduino is very easy to program and use. The Arduino is programmed using the Wiring language, which is an extension of C with many libraries to interface with various types of hardware. The Arduino IDE provides an editor and compiler for a "sketch" (which is the name for an Arduino program), and downloads the code to the Arduino board over USB. After seeing the Arduino hype at the Maker Faire, I got a Adafruit Arduino Starter Pack, and I've been happy with it. More information about the Arduino is at www.arduino.cc; the playground is a good place to start.

You can do a lot with an Arduino, but it has some limitations. There's only 30KB of memory for programming (yes, kilobytes). Many things you might want to connect (Ethernet, SD card, USB hard drive or flash) require additional hardware, and even then are pretty limited.

The SheevaPlug

The Marvell SheevaPlug is a very small Linux server with a 1.2GHz 88F6281 ARM processor and 512MB of RAM and 512MB of flash storage. The SheevaPlug has a Gigabit Ethernet connection, a SD card slot, and a serial USB console connection. This all fits into a box the size of three cassette tapes that sells for $99 and uses about 5 watts of power.
The SheevaPlug
The SheevaPlug is designed to be plugged directly into the wall as a wall-wart, but the plug snaps out and can be replaced by a power coard. I'm currently using the "desktop" configuration with a power cord, since it's easier to connect things. Marvell recently gave me a SheevaPlug, and I've been enjoying it a lot.

Because the SheevaPlug is a full Linux system, the standard Linux software packages are available and easily installed with apt-get (full list). You can run X-windows (of course you need to VPN in). You can run Apache and PHP on the SheevaPlug and use it as a web server. The GCC toolchain runs on it. You can program it in C++, Python, Scheme, or whatever.

The main information source on the SheevaPlug is plugcomputer.org. Another useful site is computingplugs.com, a wiki about the SheevaPlug which is actually served by a SheevaPlug.

There are a few limitations of the SheevaPlug. The SheevaPlug is headless, so you need to access it via ssh or VNC. You can't run x86 binaries. The SheevaPlug's performance is roughly at the Pentium III level (benchmark), so it won't replace a state-of the-art server. Also, floating point performance is poor since there's no hardware FPU. The Linux install has some annoying minor issues with apt-get, DNS, NTP, and passwd (fixes). The SheevaPlug isn't really suited for low-level electronics projects because it doesn't have any accessible general-purpose I/O pins. (The CPU has 50 digital GPIO pins, but the SheevaPlug doesn't expose them.)

Arduino + SheevaPlug

The SheevaPlug and Arduino make a great pair together for hardware hacking projects since the SheevaPlug can easily provide the web server, computing, and storage functionality that the Arduino lacks, while the Arduino makes it easy to interface to hardware circuits. Moreover, the two are easily connected with a USB cable, and then they can communicate through simple serial communication (modulo kernel details below).
SheevaPlug with Arduino
The above picture shows the SheevaPlug and Arduino connected together by a USB cable. The SheevaPlug also has an Ethernet connection (green) and power (on the right). The Arduino has some jumpers to a breadboard circuit (described below).

A sample project: illumination recording

For an initial project, I decided to collect data on the illumnination in my room. (Temperature would have been more useful, but I didn't have a temperature sensor handy.) I implemented a simple Arduino sketch (i.e. program) to read illumination from a photocell and write it to the serial port. The SheevaPlug collects the data, generates a graph using gnuplot, and provides the data as a web page on the Internet. (Sorry, no URL to access it since I'm not currently running this.)

The screenshot below shows the web page that the SheevaPlug serves showing illumination across a few days. There are a lot of spikes due to turning lights on and off, but you can see where the sun rises, light increases through the day, peaking shortly before sunset. This web page illustrates the ability of the Arduino to measure analog data combined with the SheevaPlug's ability to collect data, plot it, and serve web pages.
SheevaPlug screenshot of browser

The Arduino code

Hooking up the Arduino to measure illumination was trivial; I used a 10K resistor and a photocell connected to an analog input pin. (I made the following schematic with Eagle.)
schematic of photocell connection

The Arduino sketch below (download) simply reads the analog input once a second and writes the value to the serial port as a decimal number. (One annoyance is the Arduino IDE won't run on the ARM processor, so I have to connect the Arduino to a separate computer to download the sketch.)

int ainPin = 2;     // select the analog input pin

void setup() {
  Serial.begin(9600);
}

void loop() {
  Serial.println(analogRead(ainPin), DEC);    // read the value from the sensor and write to serial
  delay(1000);
}

The Python code

The Python code that runs on the SheevaPlug (download) is straightforward. I used a simple Python web server to provide the graph page and some static files. It uses gnuplot to generate the graph. Some highlights of the code:

The pyserial library (apt-get install python-serial) provides simple access to the serial port. One thread reads lines from the serial port and dumps them to the data file along with a timestamp. Only one sample per minute is kept, and the others discarded. The Arduino may appear as a different device, e.g. /dev/ttyUSB0. If no such device appears when you plug the Arduino into the SheevaPlug, you probably need the kernel update below.

class Arduino(threading.Thread):
  def run(self):
    f = open('/tmp/data', 'a')
    # Port may vary from /dev/ttyUSB1
    self.ser = serial.Serial('/dev/ttyUSB1', 9600, timeout=10)
    self.ser.flushInput()
    old_timestamp = None
    while 1:
      data = self.ser.readline().strip()
      if data:
        timestamp = time.strftime("%m/%d/%Y %H:%M", time.localtime())
        if timestamp != old_timestamp:
          # Only log once per minute
          print >>f, timestamp, data.strip()
          old_timestamp = timestamp
        f.flush()

The other part of the Python code is an HTTP server using SimpleHTTPServer; a /graph URL runs gnuplot on the data file to generate a png image file. The returned web page loads the image, which is served by the Python server as a static file. (Since the SheevaPlug supports Apache, PHP, and mysql, I could have used them, but it seems like overkill for a simple demo.)

 def graph(self):
    g = os.popen('gnuplot', 'w')
    print >>g, GNUPLOT_CMD
    self.send_response(200)
    self.send_header('Content-type', 'text/html')
    self.end_headers()
    self.wfile.write(GRAPH_HTML)

Kernel with FTDI Serial support

The one stumbling block I encountered when using the SheevaPlug and Arduino together is the SheevaPlug kernel doesn't include FTDI support, which is necessary to access the Arduino via USB. An upgraded kernel is available, and much to my surprise it installed with no problems.

Where from here?

So far, I've found the Arduino and SheevaPlug to work together well. I have various plans to use the Arduino + SheevaPlug for home monitoring and control, solar panel monitoring, IR remote control, and other random projects. If there's interest, maybe I'll write about them in the future.